STL vs. STEP — Polygons or Mathematics?
STL or STEP – that is the question
Choosing a file format isn't just a matter of compatibility. It's a choice between an approximate copy and a mathematical original. If you're still exporting details in STL, you're losing control over surface quality before you even hit the "Slice" button.
Why is this important in 2026?
When I started printing, STL was the standard. But today, when we use Bambu Studio, Orca Slicer, and modern firmware (Klipper/Marlin), using STL for engineering parts is like listening to music in 128kbps MP3 on an expensive audio system — it seems to work and you can hear the sound, but you "lose" the details.
In this article, we will examine not just "what it is," but how the choice of format affects surface quality, print speed and editable.
Under the hood: How a computer sees your part
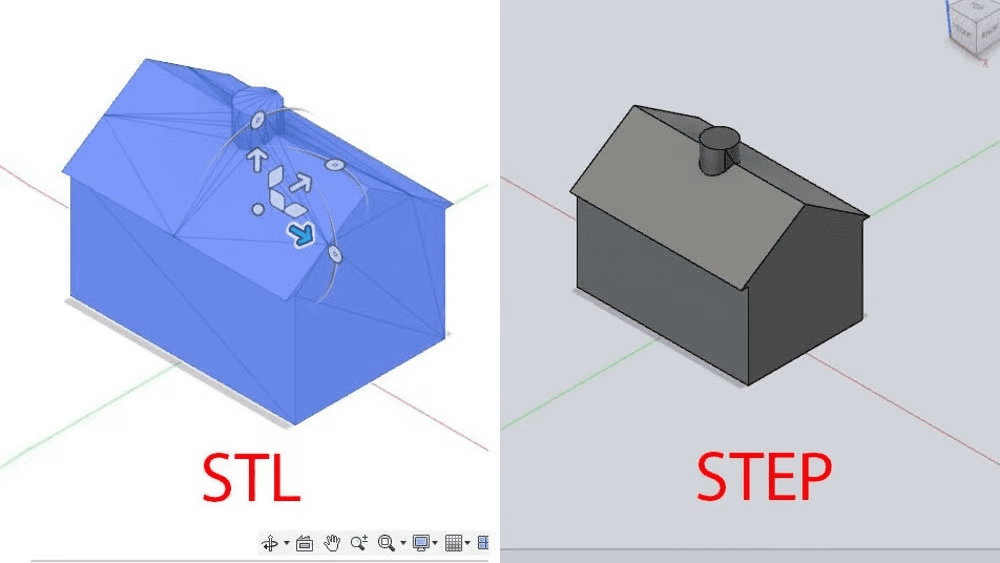
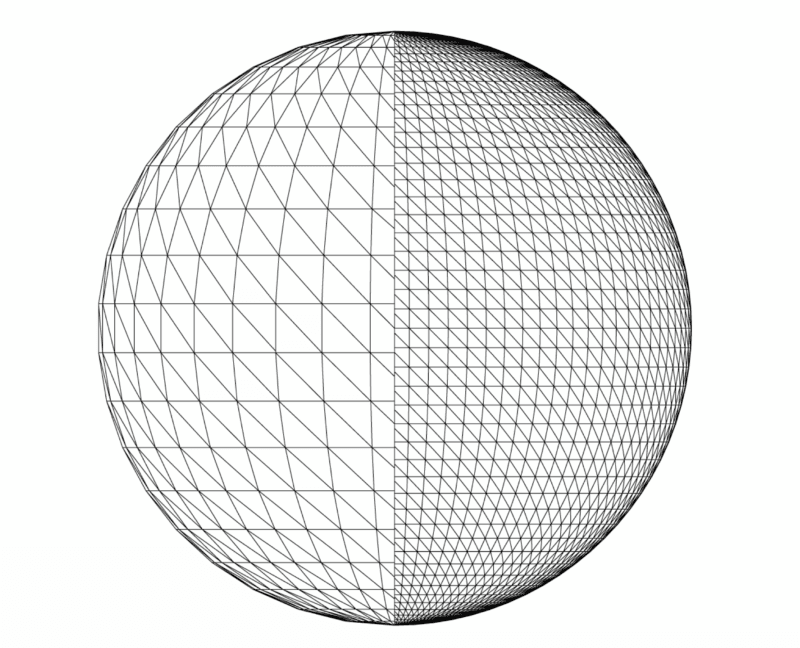
STL (Standard Tessellation Language) Imagine you want to describe a perfect circle. STL doesn't know what a "circle" is. It says, "Okay, I'll make it out of 100 small straight lines."
- Essence: It's just a "bag of triangles" (Mesh).
- Problem: Curved lines are not actually curved — they are broken lines. The more triangles there are, the better the image looks, but the file can weigh in at gigabytes.
- Editable: Almost zero. Trying to change the diameter of a hole in STL is like trying to change the ingredients in a cake that has already been baked. You can only deform the mesh, but you cannot change the parameters.
- File size: Grows exponentially with quality. A simple detail with high detail can take up 50-100 MB.
STEP (Standard for the Exchange of Product model data)
STEP does not store triangles, but mathematical descriptions of curves and surfaces (NURBS — Non-Uniform Rational B-Splines).
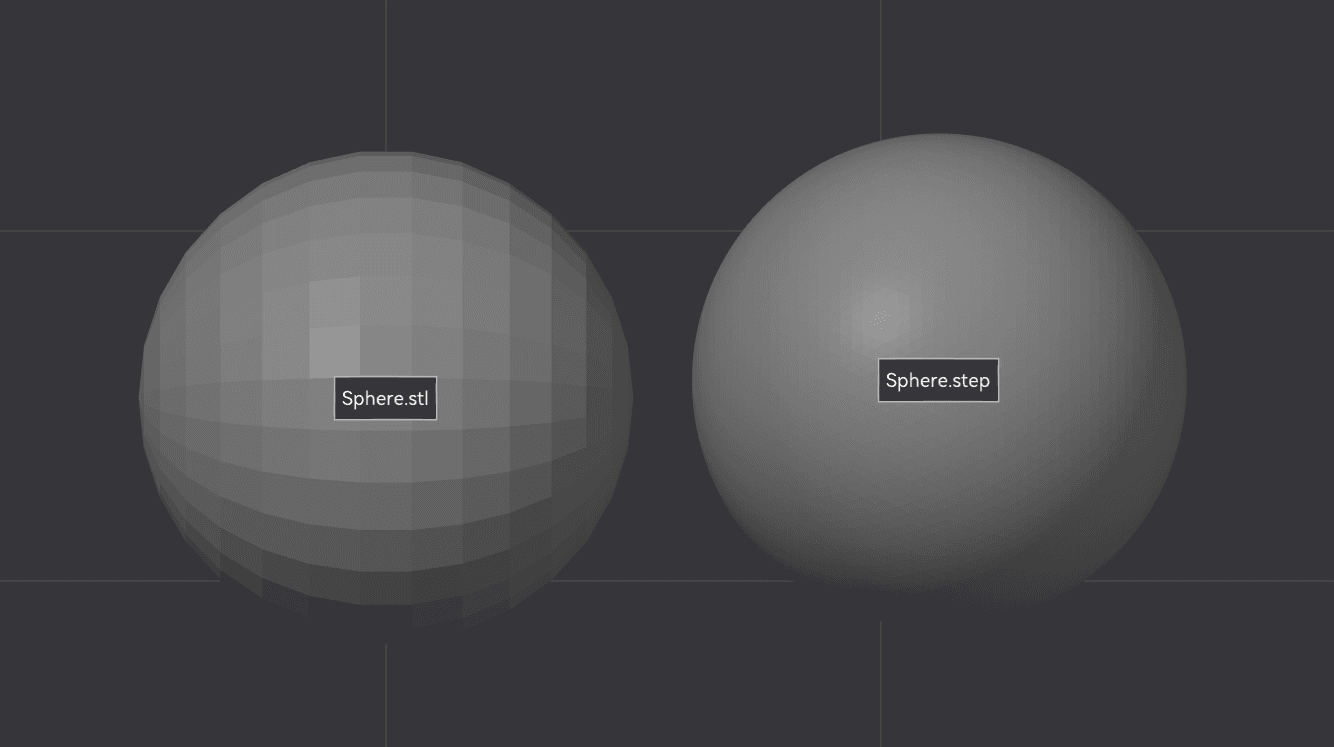
- Essence: The file says: "Here we have a cylinder with a radius of 10 mm and a height of 20 mm." This is a mathematical formula, not a set of points.
- Advantage: The quality is endless. You can zoom in on a detail under a microscope—the curve will remain perfectly smooth.
- Editable: Complete. Open someone else's STEP file in Fusion 360, select the edge of the hole, and click "Press Pull" — the size changes in a second. All parameters are "live."
- File size: Typically 5-10 times smaller than an equivalent high-quality STL.
What happens inside a slicer?
Important technical detail
Even if you import STEP into the slicer, it will still convert it to a mesh (triangular grid) before slicing. So what's the difference?
The difference in conversion quality control:
- Saint Louis You exported from CAD with certain settings (chord height, angle tolerance). These settings are permanently fixed in the file. If you chose low quality, there is nothing you can do to fix it.
- STEP: The slicer itself converts to mesh from with maximum precision, optimized for your printer. In Bambu Studio, for example, you can control tolerance when importing. If you need higher quality, simply re-import with different settings.
"Killer feature": Arc Fitting and G2/G3 commands
This is where the magic begins, but with important nuances.
Traditional cutting (without Arc Fitting):
When a slicer cuts any mesh (STL or converted STEP), it generates thousands of commands. First Grade (linear motion):
G1 X10.1 Y20.1
G1 X10.2 Y20.2
G1 X10.3 Y20.3
... and thousands of times
The printer "jerks" at each micro-segment, creating vibrations and unevenness on the surface.
With Arc Fitting enabled:
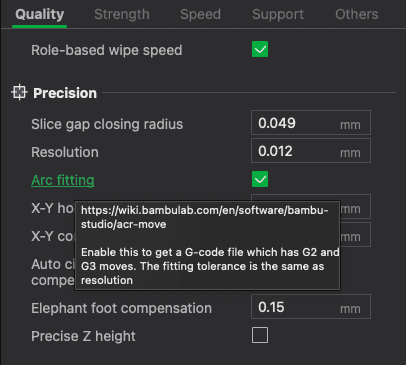
Modern slicers (Bambu Studio, Orca Slicer, PrusaSlicer 2.6+) have an option Arc FittingIt analyzes sequences of short lines and attempts to recognize arcs in them.
If the slicer recognizes an arc, it generates a single command. Second generation or Third Generation:
G2 X20 Y20 I5 J0 F3000Result:
- Smoother head movement (fewer jerks).
- Less noise from motors.
- Better surface (no small artifacts).
- Smaller G-code file size (sometimes 2-3 times!)
Why is STEP better for Arc Fitting?
Since STEP contains accurate mathematical information about curves, after conversion to mesh, these curves are approximated with higher accuracy. The Arc Fitting algorithm is more likely to correctly recognize an arc in a "clean" mesh from STEP than in a "dirty" STL exported with low settings.
⚠️ IMPORTANT: Arc Fitting and Klipper
There is a caveat for Klipper users!
Klipper by default breaks G2/G3 commands back into short linear segments for more precise control. This means that enabling Arc Fitting in the slicer can not to give preference or even slow down printing.
Recommendations:
- Bambu Lab printers (Marlin-based): Arc Fitting — ✅ Enabled
- Prusa (Marlin-based): Arc Fitting — ✅ Enabled
- Clippers: Arc Fitting — ⚠️ It is better to turn it off (or configure it).
G-code arcsу config)
For more information about Klipper settings, please refer to the documentation: G-code arcs.When to use STL?
STL is not always a bad choice. There are situations where it is ideal:
✅ Organic models and sculptures (Blender, ZBrush) — there are no parametric curves here, only complex geometry
✅ 3D scanned objects — they are mesh by nature
✅ Miniatures and figurines — STEP does not offer any advantages for artistic detailing
✅ Compatibility with older equipment — Some printers/slicers do not support STEP.
❌ Do NOT use STL for: Engineering parts with precise dimensions, fasteners, housings, functional prototypes.
When is it necessary to use STEP?
✅ Mounts for VTX, ELRS modules, cameras
✅ Electronics enclosures with precise mounting holes
✅ Protection for drones, frames, brackets
✅ Any details that need to be adjusted to specific dimensions
✅ Models for shared use — colleagues and friends will be able to easily adapt it to their needs
✅ Project archive — in a year, you will definitely remember the blessing of complete editability
Bonus: What about 3MF?
3MF (3D Manufacturing Format) — is a modern format that attempts to combine the advantages of:
- Supports colors, textures, materials
- Stores print settings together with the model
- Smaller size file compared to STL with the same quality
- Supported by most modern slicers
When to use 3MF:
- Multicolor printing (Bambu AMS)
- Transferring the project along with the slicer settings
- Saving the final result before printing
However: 3MF still stores mesh (like STL) rather than parametric models. To edit, you need the original CAD file (STEP/F3D).
Practical tips
Export from Fusion 360 / SolidWorks / FreeCAD:
**File → Export → STEP (.step, .stp)
Also save .f3d / .SLDPRT (native format) as a backup copy
Do not export STL for engineering parts
Importing into Bambu Studio / Orca Slicer:
Just drag and drop .step file to workspace In quality settings:
- Arc Fitting: Enabled (for Bambu/Marlin)
- Arc Fitting: Disabled (for Klipper)
Check the visualization — the detail should look smooth.
File organization:
/Projects
  /VTX_Mount_v2
    - vtx_mount_v2.f3d        (original Fusion 360)
    - vtx_mount_v2.step       (for slicer)
    - vtx_mount_v2_final.3mf  (ready-made model with settings)
Engineer's conclusion
If you are designing a mount for a VTX, a case for an ELRS module, a mount for a drop, or protection for a drone — forget about exporting to STL. Save files in STEP.
Advantages of STEP:
- You can easily change the model in six months.
- Your friends and colleagues will be able to adjust the part to their size in minutes.
- The slicer will have the cleanest mathematical geometry for optimal cutting.
- Arc Fitting will work more accurately (if your firmware supports it)
- Files take up less space
STL remains relevant only where the geometry is so complex and organic that mathematical description becomes more difficult than the grid (sculptures, miniatures, scans).
What if you are unsure? Keep both formats. STEP as the master copy, STL for compatibility with older equipment.